
If you built your app in FlutterFlow, publishing is not just an export step. App Store and Google Play reviewers install a fresh build, compare it with your listing, check access and privacy details, and decide whether the first session is usable. This guide gives you an approval-first workflow to catch common issues before submission.
Publishing Apps Built With Flutter, React Native, or Native goes deeper on the ideas above and adds concrete next steps.
Why does FlutterFlow app approval depend on the first review session?
The first reviewer session is colder than the founder demo. You know the product, the best data state, and the workaround for anything unfinished. Reviewers do not.
| Review moment | Founder demo path | Reviewer path |
|---|---|---|
| First launch | Familiar build with cached state | Fresh signed install |
| Onboarding | You explain the flow | App must explain itself |
| Core action | You skip to the best screen | Reviewer may stop early |
| Permissions | You explain the reason | Prompt must match a visible feature |
| Store listing | You know the roadmap | Reviewer checks the submitted build |
Explanation: reviewers start from zero context and usually follow the app as submitted, not as intended.
Practical interpretation: login blocks, endless loaders, missing features, unclear permissions, or mismatched disclosures can stop review before your strongest feature is tested.
Reader impact: a focused pre-submit pass can reduce avoidable rejections and rushed rebuilds. It is not a guarantee of approval because policy, reviewer interpretation, region, and app category still matter.
Plan for 60-90 minutes per platform for clean-install QA on a signed release build or official test track. Add more time for subscriptions, uploads, notifications, location, AI features, role-based access, or paid-only areas.
FlutterFlow’s pre-checks before publishing are a useful starting point, but your final pass should test the real reviewer path on real builds.
When you move from outline to execution, Should You Publish Your App Yourself or Hire Someone? helps close common gaps teams hit here.
How do you prepare a FlutterFlow app for App Store and Google Play review?
An approval-first workflow starts before export. The goal is to make the submitted build understandable, testable, compliant, and consistent with its store listing.
Prepare these before export:
| Area | What to confirm |
|---|---|
| Accounts | Apple Developer, Google Play Console, final upload owner |
| IDs | iOS bundle ID, Android package name |
| Assets | App icon, splash screen, screenshots, store copy |
| Trust links | Support URL, privacy policy URL |
| Access | Login, guest mode, demo credentials, paid-access bypass |
| Lifecycle | Account deletion path if users can create accounts |
If the app has gated content, subscriptions, roles, regional limits, or paid features, write reviewer notes before submission. Keep them specific to the submitted build.
The practical takeaway: do not wait until App Store Connect or Google Play Console asks for these details. Prepare them while the FlutterFlow build is still easy to adjust.
How should you test a FlutterFlow release build before submission?
FlutterFlow Preview is useful for development, but it is not a substitute for testing the signed release build. Reviewers test the installed app, not your project editor.
For Android, use an internal or closed test track when appropriate, following FlutterFlow’s Google Play deployment guidance. For iOS, test the same build path you plan to submit through Apple’s tools.
Install on clean devices
Use a clean iOS device and Android device where possible. Cached auth, seeded local data, and preview-only assumptions can hide first-run issues.
Check the first screen
Open the app as a new user. Confirm onboarding, login, home, and loading states behave without hidden context.
Force close and reopen
Watch Firebase Auth, remote config, backend queries, and conditional visibility. Cold-start failures often appear only after reopening.
Complete one primary task
Test the action the app exists for: booking, buying, tracking, uploading, generating, messaging, or saving.
Test one failure state
Deny a permission, use weak network, enter invalid login details, or submit incomplete input. A clear error state is better than a blank screen.
For a small app, this does not need to become a full QA marathon. One focused clean-install pass often catches the highest-risk approval blockers.
Match metadata, privacy, and review notes
Your store listing should describe the exact build being submitted, not the roadmap. Check screenshots, description, pricing, subscription language, feature claims, and support links against the release candidate.
Be careful with claims like “secure,” “fully automated,” “AI-powered,” or “bank-grade.” If the app does not visibly support the claim, or the privacy policy does not explain the data flow, soften the wording.
Platform forms and expectations change. Before submission, verify the current Apple App Review Guidelines, Apple’s App privacy details, the Google Play Data safety form, and relevant Google Play policies for subscriptions, ratings, and account deletion. Treat this as an operational checklist, not legal or policy advice.
FlutterFlow-specific approval risks
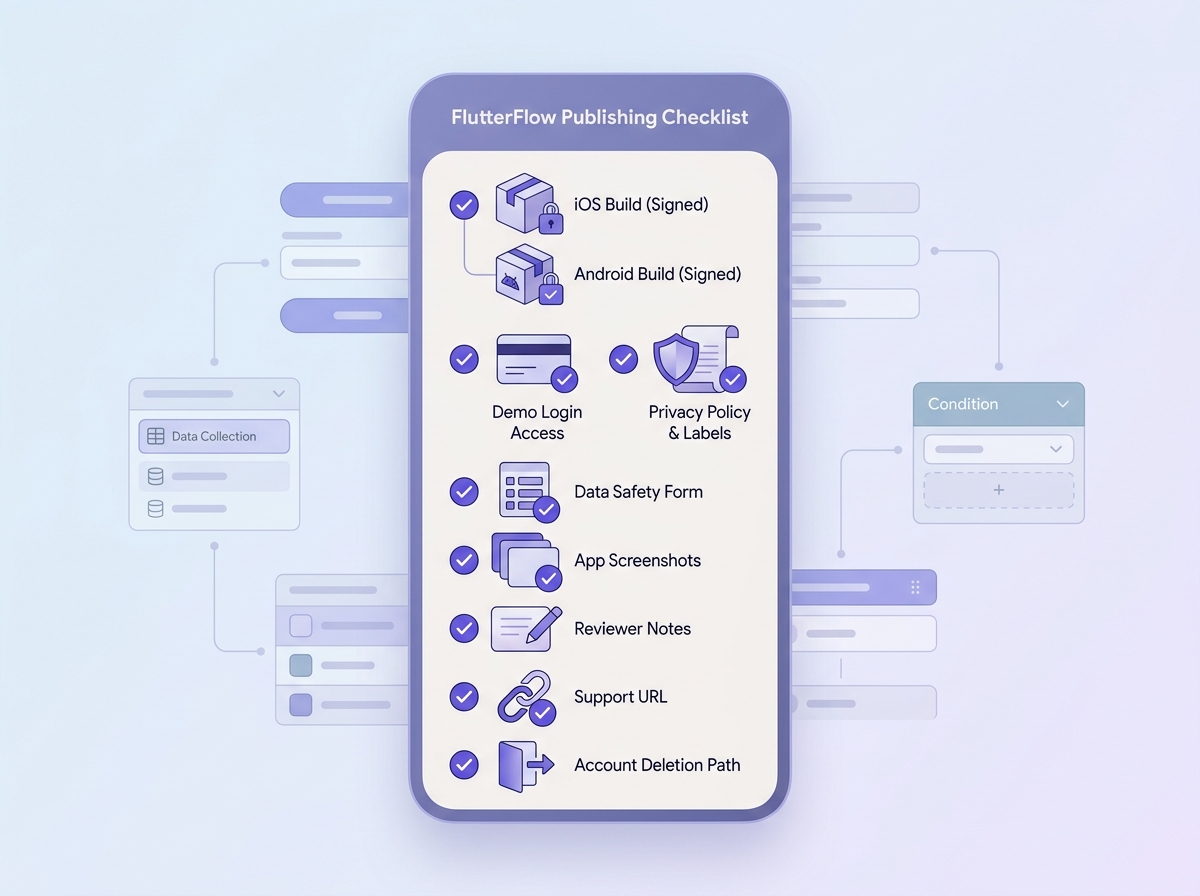
A mobile-friendly checklist block for the final FlutterFlow publishing pass: signed iOS and Android builds, demo access, privacy policy, App Store privacy labels, Google Play Data safety form, screenshots, review notes, support URL, and account deletion path.
Most publishing problems are small mismatches: a permission prompt appears too early, a Firestore rule blocks new users, screenshots show an older design, or the privacy policy ignores an integration.
Retest anything touched by generated-code or backend changes. If you edit Firebase Auth, Firestore queries, Supabase calls, custom actions, conditional visibility, or API responses, retest the primary flow.
Pay attention to clean accounts. Empty states, loading indicators, and backend rules should work without seeded data. A reviewer should not need demo narration to understand what happened.
Keep a release record:
- FlutterFlow build version or export date
- iOS bundle ID and Android package name
- Firebase or Supabase environment
- Store metadata version
- Screenshots used for submission
- Person who approved the final build
This makes review feedback easier to diagnose. It also prevents the common mistake of fixing one build while submitting another.
Final pre-flight checklist
Before submission, stop adding features. Freeze the build, test it like a reviewer, and make sure the app, store forms, and listing all describe the same product.
| Bucket | Final check |
|---|---|
| Build readiness | Signed release build, clean install tested, first launch works |
| Core flow | Primary user task completed, one realistic failure state tested |
| Reviewer access | Demo credentials, role notes, paid-access instructions |
| Store disclosures | Privacy policy, support URL, privacy labels, Data safety form |
| Platform forms | Age rating, content rating, pricing, subscriptions if used |
| Listing match | Screenshots, copy, permissions, and features match the submitted build |
In practice, most last-mile approval issues come from mismatch. Apple and Google may compare privacy labels, Data safety responses, account deletion paths, ratings, subscription behavior, and metadata against what the app actually does.
Verify the latest platform documentation before you submit. Then make the build, forms, and listing say the same thing in plain language.
Hand off your FlutterFlow publishing pass
Froxi helps teams review clean-install flows, store metadata, privacy disclosures, and reviewer access before App Store and Google Play submission.
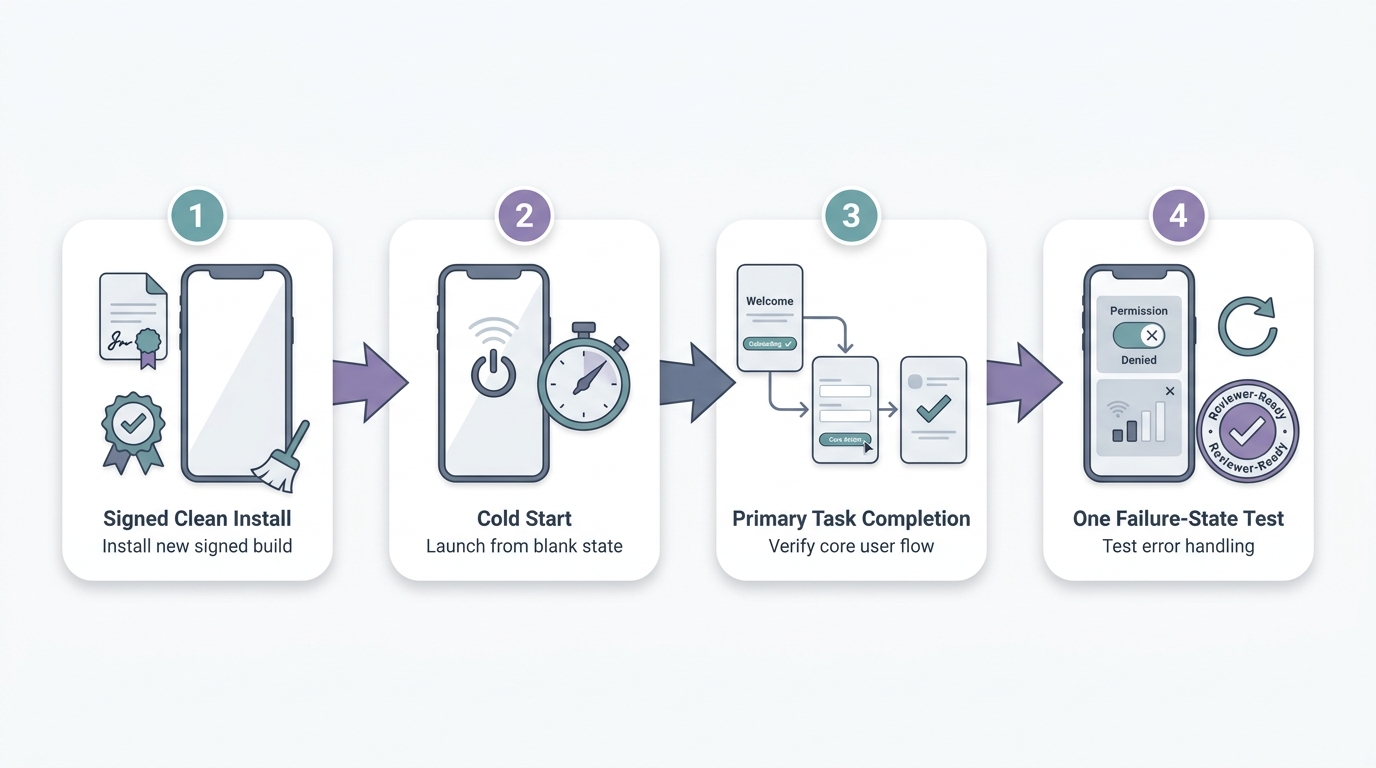
A four-step process diagram for testing a FlutterFlow release build before submission: install signed build on clean device, cold start, complete primary task, and test one failure state such as denied permission or weak network.


