
If your team builds mobile apps in Flutter, React Native, Swift, Kotlin, or Java, publishing can feel like a different process every time. The useful truth is simpler: the framework changes how you create the signed package, but the store workflow is largely the same after that. This guide shows what differs, what stays consistent, and how to run one practical release process across all three build approaches.
How to Publish a Cursor-Built Mobile App goes deeper on the ideas above and adds concrete next steps.
Early Proof: Only the Package Build Changes Before Store Upload
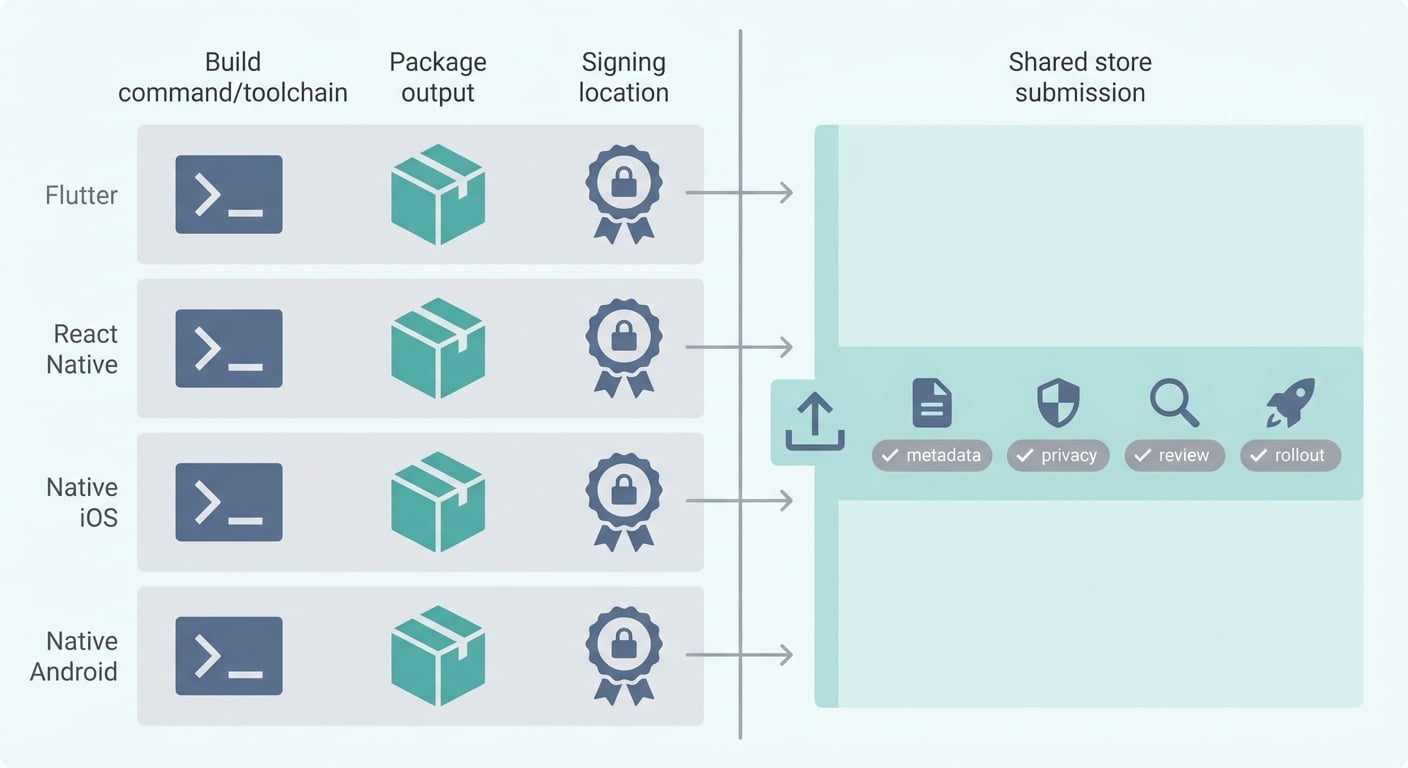
A compact comparison matrix showing Flutter, React Native, native iOS, and native Android in rows, with columns for build command or toolchain, package output, signing location, and shared App Store/Google Play submission tasks.
The biggest release difference usually happens before App Store Connect or Google Play Console. Flutter, React Native, and native projects use different tools to generate the final package, but the stores evaluate the uploaded app through the same publishing flow.
Official Flutter docs describe Android release configuration, signing, and building app bundles in the Flutter Android deployment guide. React Native’s official docs cover release signing and generating Android builds in the React Native publishing guide for Google Play. Google Play’s own guidance starts from the uploaded app bundle and moves into tracks, review, and rollout controls in Prepare and roll out a release.
| Build approach | Package output | Signing and configuration | Store upload destination | Same after upload |
|---|---|---|---|---|
| Flutter | IPA for iOS, AAB for Google Play, APK for some testing | Xcode signing, Gradle config, bundle ID, application ID, versioning, keystore | App Store Connect, Google Play Console | Screenshots, privacy fields, ratings, release notes, review, rollout |
| React Native | IPA for iOS, AAB for Google Play, APK for some testing | Xcode signing, Gradle config, package name, provisioning profile, keystore | App Store Connect, Google Play Console | Screenshots, privacy fields, ratings, release notes, review, rollout |
| Native iOS | IPA | Xcode archive, certificate, provisioning profile, entitlements, bundle ID, build number | App Store Connect | Screenshots, App Privacy, age rating, release notes, review, phased release |
| Native Android | AAB for Google Play, APK for some testing | Gradle release build, Play App Signing, keystore, application ID, version code, target SDK | Google Play Console | Data safety, content rating, release notes, review, staged rollout |
The practical interpretation is straightforward: treat build generation as framework-specific and publishing as store-specific. Once the signed IPA or Android App Bundle exists, your release owner should not need three separate publishing playbooks.
A compact process diagram would show four rows - Flutter, React Native, native iOS, and native Android - feeding into two upload destinations. After upload, the rows merge into the same tasks: metadata, privacy, screenshots, ratings, review submission, and rollout monitoring.
The business impact is cleaner ownership. Engineers can focus on producing a valid signed package, while founders, agencies, and product teams can manage the store submission through one repeatable checklist. The tradeoff is that someone still needs to maintain that checklist as SDKs, store policies, and app behavior change.
When you move from outline to execution, How to Publish Your Bolt-Generated Mobile App helps close common gaps teams hit here.
What Differs When Publishing Flutter, React Native, and Native Apps?
The framework matters most when you create the release artifact. This is where build commands, platform folders, signing files, dependency behavior, and local environment setup can change the outcome.
For Flutter, you still publish through iOS and Android platform projects under the hood. The Flutter deployment overview separates platform-specific deployment paths, which is useful because the real work still has to satisfy each store’s requirements.
For React Native, the same idea applies. React Native gives you a JavaScript layer, but Android still relies on Gradle and iOS still relies on Xcode. The official React Native publishing guide for Google Play walks through release signing and generating a publishable Android build.
Native iOS removes the extra Flutter or React Native packaging layer, but it does not remove release discipline. You still need a valid Xcode archive, the right provisioning profile, a signing certificate, correct entitlements, a matching bundle ID, an incremented build number, and a successful upload path into App Store Connect or TestFlight.
Native Android works the same way on its side. You need a Gradle release build, an Android App Bundle, Play App Signing configured correctly, access to the right keystore, the correct package name, a valid version code, and compliance with current target SDK requirements.
The practical takeaway: native development can reduce framework-related build surprises, but it does not shorten the publishing checklist. Native teams still prepare screenshots, privacy disclosures, age ratings, release notes, review responses, and rollout monitoring just like Flutter and React Native teams.
A complementary angle worth comparing lives in Web App or Mobile App? The Real Tradeoffs Founders Face in 2026.
How Do You Publish an App After the Build Is Ready?
Once your signed IPA or Android App Bundle is ready, stop thinking in frameworks. Think in store workflow.
- Upload the signed package
Send the IPA to App Store Connect or the AAB to Google Play Console. At this stage, the store validates the package, version, signing, identifiers, and platform requirements.
- Complete store metadata
Add the app name, subtitle or short description, full description, category, contact details, support URL, and marketing URL where required. The framework does not matter here, but consistency does.
- Attach screenshots and previews
Upload the required screenshots for target devices and locales. Screenshots often shape the first impression before a user reads your description, so budget time for review instead of treating them as an afterthought.
- Complete privacy and safety fields
Apple App Privacy and Google Play Data safety must match what the app and its SDKs actually collect or access. Plugin behavior from Flutter packages or React Native modules can affect store answers even when the feature seems small.
- Set ratings, pricing, and availability
Choose age ratings, countries, pricing, and distribution options. Google Play’s release guidance explains how releases move through review and rollout controls in Play Console after you prepare the release.
- Submit for review and monitor rollout
Submit the app, respond to review issues, then release through a phased iOS release or staged Android rollout when appropriate. In practice, staged release controls help reduce risk when a new build touches payments, login, maps, push notifications, or native UI.
A left-to-right workflow is the simplest way to visualize this: Flutter package, React Native package, and native package all merge into the same lane. That lane moves through upload, metadata and privacy completion, store review, and phased or staged release.
For a routine update, this post-build work may take 30-90 minutes if assets and privacy answers are already current. A first submission, new SDK, account transfer, rejected build, or regulated category can take much longer and should get a separate review buffer.
For tradeoffs, checklists, and edge cases, Why Publishing Requires Structured Execution, Not Guesswork rounds out this section.
Why Do Flutter, React Native, and Native App Releases Fail?
Teams often blame the framework when a release fails. In reality, many failures come from signing, identifiers, policy fields, or mismatched store metadata.
Two common examples show up again and again. First, the app version is updated in one place but not another, especially across Xcode, Gradle, and framework config files. Second, a release build uses the wrong bundle ID, package name, provisioning profile, or keystore.
The practical takeaway is to separate build errors from publishing errors. If the package cannot be generated or signed, it is a build-lane issue. If the package uploads but gets blocked on forms, policy, screenshots, or review, it is a store-lane issue.
A third mistake is ignoring framework plugin side effects. This is where a small feature can create a bigger review or privacy burden than expected.
- Audit Flutter plugins and React Native modules for camera, microphone, location, contacts, Bluetooth, push notifications, advertising ID, maps, WebView usage, and background execution.
- Check native consequences even when the feature looks simple. A React Native dropdown may be harmless, while maps, WebView, animation, or rendering libraries can introduce native permissions, SDK behavior, or performance considerations.
- Update iOS purpose strings, Android manifest permissions, Google Play Data safety answers, and Apple privacy disclosures so they match actual app behavior.
- Include plugin and native dependency changes in internal QA release notes, even if the user-facing feature is small.
- Watch SDK policy changes. A dependency that passed review months ago may need updated disclosures or configuration in the next release.
This is where "native" means platform-level iOS or Android behavior. It is not just about the language you wrote most of the app in. Flutter and React Native can still trigger native permission, privacy, and SDK review requirements.
The Last Step AI App Builders Don't Solve: Publishing reframes the same problem with a slightly different lens - useful before you finalize.
Execution Checklist for a Clean App Store and Google Play Release
Category: Quality
Statistic: 22%
Label: Rework before review
Context: Dropped with clearer briefs
Category: Operations
Statistic: 52%
Label: Cycle-time reduction
Context: After standardizing release prep
Category: Capacity
Statistic: 9.4x
Label: Review throughput
Context: Per reviewer per week
Use one checklist for every release, then add a small framework-specific build section at the top. This keeps the team aligned while still respecting the technical differences between Flutter, React Native, and native projects.
| iOS readiness | Android readiness |
|---|---|
| Bundle ID matches App Store Connect | Application ID matches Play Console |
| Signing certificate is valid | Keystore access is confirmed |
| Provisioning profile is correct | Play App Signing is configured |
| Xcode archive uploads cleanly | Android App Bundle builds cleanly |
| Build number is incremented | Version code is incremented |
| TestFlight build is available | Internal or closed testing track is ready |
| App Privacy answers are current | Data safety answers are current |
| Screenshots match current UI | Screenshots match current UI |
| Release notes are written | Release notes are written |
| Phased release decision is made | Staged rollout decision is made |
Before submission, run the checklist as a short operational review. The owner should confirm build validity, store assets, privacy answers, review notes, and rollout plan.
One honest caveat: maintaining one checklist still requires real ownership. Someone needs store account access, regular SDK and privacy reviews, time to update policy fields, and buffer for unpredictable review questions or rejection cycles. A shared checklist reduces chaos, but it does not remove the work.
After submission, keep watching the release. Store review feedback, crash reports, login failures, payment issues, or permission prompts can change your rollout decision quickly.


